If you have ever seen Pineapple Express, the 2008 notorious coming of age cannabis film from Seth Rogan and James Franco, or even been around on Tumblr in the 2010s, then you may have seen the cross joint before.
While this maybe wasn’t invented in the film, Seth Rogan does attest to rolling all the joints on screen, including the cross joint they iconically smoke.
The cross joint seems to elude even the most experienced smokers and rollers of the world.
The sacred nature of the joint also comes through in the ritual of rolling it – not only is this a hard joint to roll, but it’s potentially one of the most aesthetically pleasing too.
If you can roll a cross joint, not only is it fun, a great exercise in rolling, but it looks epic and will impress everyone at your next smoke out.
If you have any sort of special occasion, or just a lot of weed, this is a really fun way to make use of our beloved skunk.
But let’s be clear, you may need around 2 – 5 grams of bud with this, depending on if you smoke with tobacco or not.
Here’s our simple step-by-step guide on how to roll a cross joint just like the one on the screen. It might take a few tries, but we guarantee that these steps will lead you on the stairway to heaven.
4/20 Praise It!
Step 1
Okay, the first step is always the easiest, but requires some common sense and approximation on your part for this to be effective.
You essentially need to roll two joints, of two different sizes. The first one should be the full length of a normal king-size paper, plus a filter. This joint needs to be relatively straight, but also quite ‘fat’.
You want the circumference of this first joint to be bigger than usual but thick enough to poke a pencil through.
We recommend using around a gram in this larger joint, maybe less if you use some with tobacco, which will certainly help with burning problems people run into.
Without tobacco, though, around a gram or more.
This one joint is the main structure of the cross so to speak, so it needs to be sturdy enough for the second joint to go through but not so packed that the joint can’t make it through (this will all make sense soon).
Step 2
Now, onto the second joint, this forms the shorter part of the cross.
This joint needs to essentially intersect the larger joint, you also need to consider that this joint is going to be lit at both ends, so this doesn’t need a filter and both ends need to be appropriate to light.
Make this joint relatively thin, at least half the circumference of the large joint, this joint also needs to be shorter, around the length of a regular rolling paper.
This is so that the three ends of the joint can smoke at the same time while also meeting at the intersection.
This joint should be approximately two thirds of the length of the large joint.
You don’t want to spend all this time rolling for the vertical part of the cross joint to smoke out before you have smoked all the weed in the other two horizontal parts.
You want them to smoke down at the same time and speed, so they meet at the intersection.
By the end of Step 2, you should have two joints, one normal joint which is thick and long with a filter, the other needs to be short and thin with two smoking ends.
Step 3
Here’s where things require some forward-thinking. In order to draw on all three sides of the cross at the same time and also evenly, potentially the hardest thing to get right, there are a few things we need to consider.
Firstly, you need to create a hole in the shorter joint in order to create airflow down the joint as well as across.
The implement with which you choose to create this hole is up to you, the very tip of a pair of scissors is a good choice.
Here you can make a small incision on both sides and twist the scissors end gently in order to make the hole big enough.
The joint should still be intact, just simply with a small hole that intersects the joint perfectly in the middle of it, like a tunnel.
Step 4
Now that the smaller joint has an airflow hole directly in the middle, we can move onto the bigger joint.
The small joint needs to intersect the larger joint, as we mentioned.
So, there needs to be a hole in the large joint, around two thirds of the way up the normal joint. This joint is not for airflow, rather, it is for the small joint to go through.
A large implement might be required, this is why scissors are good as their blade is thin at one end and becomes wider the further you go up.
With both holes, seriously think your way around it before you do it. If you make a mistake at this stage you can simply re-roll and go back some steps.
Only after lighting the joint will anything be irreparable.
Obviously, this hole needs to be big enough for the small joint to go all the way through, while also being snug enough to help keep at least some airflow going. In other words, you don’t want it to be loose.
You can easily prevent this by making the hole small to start with and then twisting and wiggling the thin joint through.
Again, we encourage you to read the instructions and think a little: the hole we created in the thin joint needs to intersect the large joint so that the hole is parallel with the top and bottom of the large joint.
In other words, the tunnel you created in the thin joint needs to align with the rest of the joint, if the hold is blocked by sides of the other joint there is no airflow to draw through, you have created the opposite.
The last tip for this part is to make sure that the ends of the thin joint are even with the large joint.
The large joint may be thicker, this is fine, but they need to be similar in length so they burn down to the same point.
If you have done this correctly, you should have a large joint with a hole in it which you have pushed the thinner joint through so that the airflow holes align with the rest of the joint’s shape. You should now have a rudimentary cross shape.
If anything is wrong, fix it now before we start the finishing process.
Step 5
This should be the last step of rolling you have to do, this step is mainly about securing the airflow in the joint we have just created.
As we mentioned, you have a rudimentary shape, but if you tried to smoke this the smoke would leave where the holes meet as there is nothing containing it.
The next step is about securing this airflow by sort of plastering over the gaps and holes with bits of your rolling paper.
Get another paper or two out and attempt to remove the gum.
You basically just want strips of the gummy, with as little non-gummy paper as possible, so that you can simply lick the whole thing and apply it to the holes.
So, lick one at a time, and apply diagonally across the intersection.
Your intersection should look like this (+) you want the strips of gummy to stick to the intersection in a way that means no smoke will escape. It should be a diagonal cross like this (x).
You can test if you have covered all the holes by doing a ‘dry pop’ or ‘dry draw’ through the joint.
This simply means trying to draw on the joint without lighting it. There should be physical signs you can see as well as feel and hear, that there are no holes and the airflow is secured.
Step 6
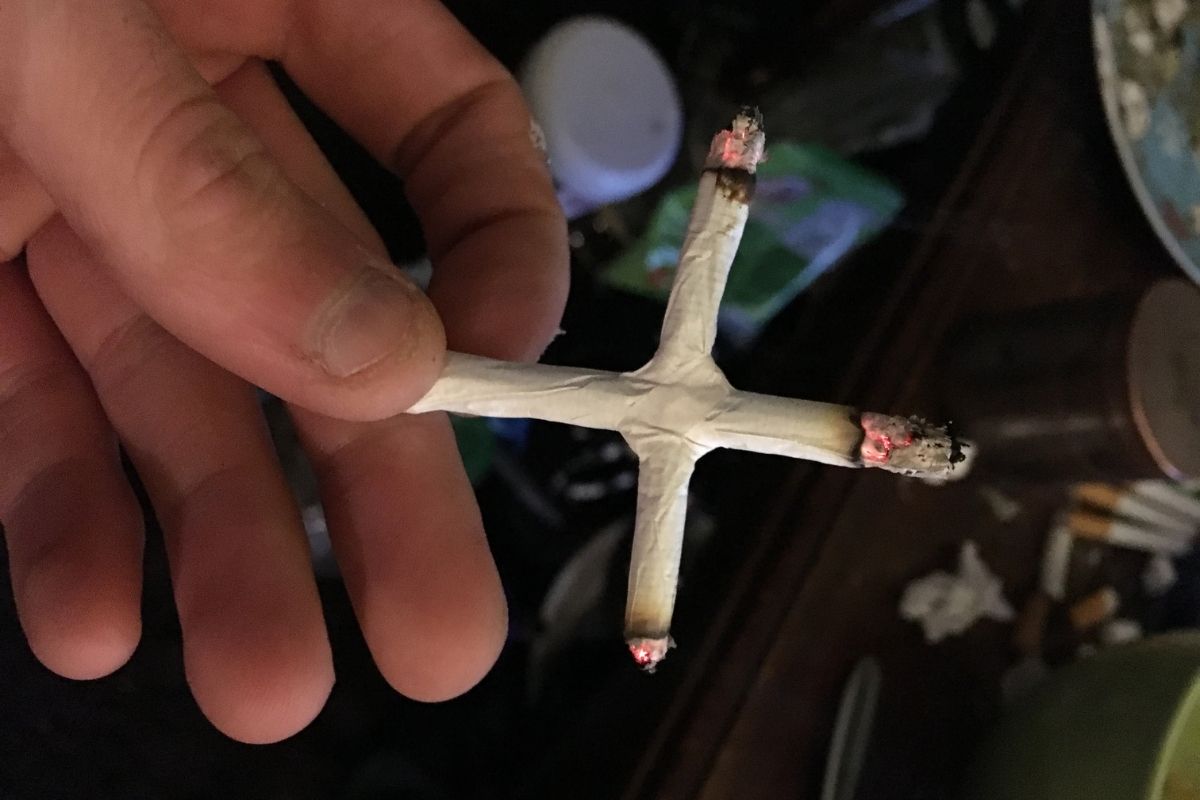
Okay, with the airflow secured, you should have a cross joint that has been rolled to perfection.
Here’s a quick checklist to check if anything has gone wrong. You should have a long thick joint which has a shorter and thinner joint impaled through it. There should be a hole in the small joint that allows for airflow.
The hole where one joint impales the other should be covered by other bits of paper which help secure the airflow.
If all this is done, you should be ready to light the joint, which still isn’t as simple as you would expect.
As we’ve mentioned a few times, you really want the three sides to burn at the same speed with each draw.
If you get it right they should all burn down to the middle point, turn into one big cherry, and then you should just have a normal joint once all three sides have been smoked.
One tip that many people enact, and is a fun way to get the party involved, is to get three lighters going, one on each side.
Light them all at the same time, try to keep an eye on whether they are smoking all the same way and you should be fine.
Getting these three sides to burn at the same time and equally is the harder part and what often leads to the most problems. The earlier steps are in place so that this should hopefully be avoided.
Final Thoughts
With these easy to follow steps, you should be able to figure out how to roll a cross joint. It is certainly something that takes good practice, and not something worth trying too early on in your rolling career. Even expert rollers might mess this one up.
Happy blazing and praising!
Frequently Asked Questions
Did Seth Rogan Invent The Cross Joint?
No, Rogan admits this himself in an interview with Wired: ‘We had like, a book of novelty joints that someone had given us, and we rolled them in high school. They were like party…it was like a party trick, kind of.
I only wish I had the ingenuity to invent the cross joint. I’m not an engineer’
Although Rogan and Franco were probably the ones we can endear the popularization of the cross joint too. We can only give him as much credit as the Romans.
Hello, my name is Tom Bowler and I have been interested in the studies of cannabis for years. My brother and I have been testing out different strains and smoking techniques since we were in our early 20s, so we have some knowledge to impart on anyone willing to listen.
This website is a safe space for people genuinely interested in cannabis to learn in a judgment-free zone. We’ll look at the different ways it can be smoked, rolling techniques, strains, and much more.
So, stay a while and get acquainted with the world of cannabis - it’s not as dark and scary as the rest of the internet would have you believe.